Have a room that is way too big? A two car garage you would like to turn into a one car garage and home office? A basement that is unfinished? Well then Doc can lend you a hand getting a separation wall built to define your new spaces. Although it looks intimidating at first it truly is the easiest thing on earth to do!! Hey Doc can do it so that should say a lot!! You will want to start your project at your local lumber yard but before you throw that cash down you will need to figure out several very important facts.
First you need to know if you want 2×4 or 2×6 lumber. For walls that will be carrying a lot of support, load bearing walls, then you will need the 2×6 lumber. These would be walls filling exterior openings such as where a garage door once stood or walls spanning a large expanse of space such as a basement wall. For walls that will not be carrying a lot of support, non-load bearing walls, you will use 2×4 lumber. These would be most of your interior walls. If you can get away with 2×4 construction do so to help eek out more square footage. Every inch does add up to more living space!! Due to the planning process new construction dimensional Kiln dried lumber doesn’t in fact measure 2×4. It actually measures 1 1/2×3 1/2. The same goes for any other dimensional lumber you purchase. Consider your home’s age and construction size if dealing with exterior walls such as at a garage door opening. Some older prefab homes are built with 2×4 construction (Code today in most states is 2×6) and even older homes (Around 1900 and back) were built with lumber that was true to dimension in that 2×4 was 2×4!! For convenience I am going to use 2×4 construction on a 10′ wall for my instructions from here on out.
Now you need to look at your room height. Standard room height is around 8′ but you can go with any other height you need. Just remember that the end number on the lumber bins tells you the height. For example, 2x4x8 would be 8′ tall. 2x4x16 would be 16′ tall. Some lumber yards charge per board foot and some charge a base rate. The prices are constantly on the move so be sure to pay close attention.
Lastly you will need an approximate count of how many pieces of lumber to acquire. For a wall that is 10′ long you would want about 10 2x4x8s for the upright studs and 4 2x4x12s for the base plate and header. So how did I get that number? Standard code is 16 on center. What that means is that the center of one stud will be exactly 16″ from the center of the next stud. So you have a 10′ wall times 12 would equal 120″. Divide this by 16 and you would need 8 studs to span the wall. I then added two spares for scrap (These are for your mistakes and I guarantee we will all have them!!). You will also need a double header and a base plate plus a scrap piece for the top and bottom so that equals 4 pieces there. Buying these a bit big allows you to cut off the imperfect ends for a good level fit. If you have any uncut scrap most lumber yards will allow you to return these with a receipt. I always prefer to have too many rather then have to drop everything and return to the lumber yard over and over again.
While at the lumber yard you will want to pick up some sheets of sheetrock or Hardi Backer for interior use and/or sheathing grade plywood for exterior use (7 4×8 sheets should do for a double sided 10′ wall. 6 for the wall and 1 for scrap.). Oh, and don’t forget your nails. Tell the lumber yard you want framing nails and make sure to note whether you are doing an interior or exterior wall. They will get you the exact pounds that you will need. Just give them your wall size that you plan to build. If you are walling off a garage door opening or building a basement wall you will want the foam sheets you normally place between the foundation and sill plates on new construction. You will also want to create a double base plate. To do this you will need to purchase a piece of 2×6 pressure treated wood a little bigger then the garage door opening or wall you are constructing. Lastly, make sure you have a good hammer or nail gun, a good measuring tape, a chop saw with a wood framing blade already installed (I like the Diablo brand blades myself), a large level, joint tape, sheetrock mud, fine grit sandpaper, insulation for exterior walls or between heated and unheated spaces, sheetrock screws, a screw gun and a good friend for lifting the wall into place.
Now for the fun part…….building the wall!! You will start by cutting your 2x4x12s to 10′ lengths and your 2x4x8s to 91.5″ lengths. The 4 1/2″ difference allows for your base plate and double header. If you are filling in a garage door opening or doing a basement wall take another 1 1/2″ off to accommodate the additional base plate of pressure treated wood. Do this by cutting a piece from either side of the lumber. This will ensure you have a nice straight cut for which to attach your remaining pieces. Ultimately this will create a nice level wall. Now you will construct a simple box made up of 2 2x4x91.5″s on the vertical and 2 2x4x10s on the horizontal. Line the 2x4x91.5″s up with the edges of each 2x4x10 being careful to attach the 2x4x91.5″s in such a fashion that they are not butted against the ends of the 2x4x10s but instead, attached against the wide side of the 2x4x10s. If you should butt one to the other you will find that your wall measures 10’3″ and not 10′ as desired. Now that you have a box run your measuring tape from corner to corner on the diagonal creating an imaginary X across the box. If both legs of the X are the same measurement then you are good to go on to the next step. If the legs are off maneuver the box about until they do measure correctly.
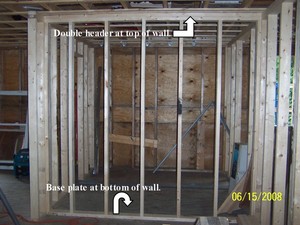
Next you will be adding your remaining 2x4x91.5″s vertically to the inside of the box. On your base plate and top plate mark a line every 16″. If you have measured all the 16″s you can then find yourself with a 24″ hole don’t panic!! Just measure from your last 16″ over. Place another stud here. It will not matter if your last stud is under the 16 on center code. However, over 16 on center will be frowned upon by your local building inspector. Attach each 2x4x91.5″s by centering its smaller side’s center on the lines you have drawn to the top and bottom plate. Nail these into place. Once you are done nailing everything into place check your imaginary X again to make sure you are still pretty square. Now add your top plate by simply nailing it on top of the other top plate. This will form a good strong double header. If you are filling in a garage door or building a basement wall add your pressure treated piece to the bottom. Otherwise you are done with your basic wall!!
It is time to call your friend and hoist it into place. This often times requires the use of a sledgehammer to coax it into place. Just watch for fingers, toes, hands, feet and your friend’s head!! Now that the wall is in check it for level both horizontally and vertically. If everything is good then nail your base plate into the floor. If you are working in a basement or filling in a garage door opening make sure there is a piece of the foam I described above adhered to the floor just below the pressure treated piece of wood. This is an added precaution to keeping moister from wicking up your wall and destroying all of your hard work. Dry Lock also works great. Just paint the floor and let dry before installing the wall. If your wall is not level tap it with your sledge hammer and keep retesting it until it is perfectly level.
At this point you will want to call your electrician to attach any lighting and electrical outlets. Typically you will want an outlet every 3-4 feet for code. After the electrician is done you can add your sheetrock. If you are working in a basement use Hardi Backer. This material is meant to withstand moisture. If you are working on an outside wall use exterior sheathing on one side and Hardi Backer or sheetrock on the other. Install whichever product you are using sideways so you have 8′ of the wall covered side to side and 4′ of the wall covered top to bottom. Screw into place, cutting where necessary, until the wall is completely covered. Use joint tape over all seams on Hardi Backer and sheetrock applications and then apply mud. Allow the mud to dry before sanding thoroughly. Apply another layer of mud and allow to dry. Sand once again. If the wall now appears smooth and soft to the touch then you are ready for primer and paint!!
Adding doors and windows are another thing you may want to consider. If you do just remember this simple tip…….windows and doors require a top plate or header just like a wall does. Windows also require a base plate just like a wall does. Take a look at my pictures for examples of door, window and basic wall construction. The headers on all windows and on doors placed only on supporting or exterior walls is created by sandwiching two 2x6s together and then nailing them into place between two studs set out the distance of your window or door opening. The base plate on a window is created with a simple 2×6 set at the distance of your window opening and placed between the same two studs as the header. Below the window base plate you will place a 2×6 stud vertically at a equidistance to the two studs aforementioned. This adds structural support to the window as well as to the wall. Remember, every time you poke a hole in the wall you take structural integrity away from the wall.
If you have any questions whatsoever just drop me a line and I will try to clarify for you. Although this sounds tricky on paper it is truly easy in person. Truly the only trick to building a wall is making sure everything is truly level!! Good luck and have fun with this project!!


