Materials you will need:
Two sheets of ½ oak veneer plywood
Oak veneer sheet
Wood glue and biscuits
Drawer pull assembly
Drawer handle
Tools you will need:
Biscuit joiner
Power sander
Screw gun
Router with a ½” flat bit
Begin with setting up a set of sturdy sawhorses to cut the plywood on. Measure and mark with a pencil the two sides of the nightstand. Cut the angle once. Measure and mark both sides of the nightstand one on top of the other making sure you don’t waste the plywood. It is really expensive! Using a white chalk line, Snap the line between the two marks. Using a brand new fine cutting blade slowly cut the oak plywood veneer with the circular saw. Sand any rough edges and set them aside labeling them “sides”.
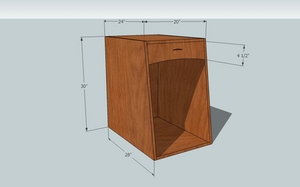
Now using the same technique as you did one the last two pieces cut the top, bottom and back. Gently sand any rough edges and set them aside labeling them as “top, bottom, and back” accordingly. Use the blueprint for all of the measurements you will need for this project.
Time to cut the drawer pieces. Begin by measuring and marking the remaining pieces of ½” oak veneer plywood at 4 ½” high by 18 7/8″ wide. Sand and set this piece aside labeling it “drawer front”.
Now measure and mark the plywood for the back of the drawer at 4″ high by 17 7/8″ wide. Sand any rough edges and set this piece aside labeling it “drawer back”.
Now measure, mark and cut the two sides of the drawer at 4″ high by 23″ wide. Once again sand the rough spots and label these two pieces “drawer sides”.
Finally, finish by measuring, marking, and cutting the final piece of ½” oak veneer plywood at 18 7/8″ by 17 3/8. Sand and set this piece aside labeling it “drawer bottom”.
Now it’s time to assemble the nightstand. Grab the biscuit joiner and mark three places along the top of the pieces labeled “sides”. Make three biscuit slots 1/8″ from the top and glue in the biscuits. This recess on the top of the nightstand is just enough to help prevent objects from getting accidentally knocked off.
Next, cut four biscuit slots along the back edge of each of the two pieces labeled “sides”. Glue in each biscuit with wood glue.
Finally, cut four more slots along the bottom of the two pieces labeled “sides”. Raise these biscuit slots up from the bottom ½” to provide a recess that allows the legs to set squarely on the ground. Insert and glue in the remaining biscuits.
Now cut matching biscuit grooves into the pieces labeled “top, bottom and back”. Put a little glue on each of the biscuits before you assemble each piece. It will be a little difficult to insert all of these pieces together at once. Have a friend help hold the nightstand as you assemble it.
Once the nightstand has been assembled allow the glue to dry and wipe off any excess glue with a damp rag. Clamp or tie together the structure for added strength during the drying process.
Assemble the drawer pieces next. Using a router with a ½” flat bit cut a groove ¼” deep ¼” up flush from the bottom inside of each of the drawer pieces. This will allow the drawer bottom to slide into each groove and hold the drawer together at the same time.
Glue the pieces labeled “drawer bottom, drawer sides and drawer back” together. Don’t glue on the front just yet, you’ll need to make a cut first. Allow the drawer and nightstand to dry overnight.
When the drawer and nightstand have dried, attach the drawer hardware to the sides of the drawer and the inside of the nightstand according to manufacturer’s specifications.
Now slide in the drawer. Mark the angle of the nightstand against the drawer on each side. Connect the two lines across the drawer bottom but extend out the line ¼”. This will allow the drawer bottom to fit into the drawer face. Cut the three marks.
Finally, glue the face of the drawer to the rest of the drawer. Add on a handle to the drawer and you now have a complete nightstand ready for staining and finishing.


