My husband I are in the process of a financial makeover. Part of the journey is making sure our monthly bills are paid on-time and in full. Of course, it’s hard to pay the bill when you can’t find the statements. While most of the invoices are available online, I prefer to have the actual bill in hand when I sit down to make the payments.
I like to pretend that I have always been an organized person but just ask my college roommates and you will find that I have always been kind of scatterbrained and while organization has always been a great idea in theory it has never made it to practical application. I realized that when we decided to begin this journey into clearing up our finances that I would have to organize everything or I would have no idea where things were going. With all the past due bills and collections organized using my system. I sat down to determine how I could organize our monthly bills so that nothing slipped through the cracks. The last thing I want to deal with is the electric company showing up at the door to disconnect it. I have been there and don’t plan on going back again.
This is the system I devised for keeping track of my monthly bills:
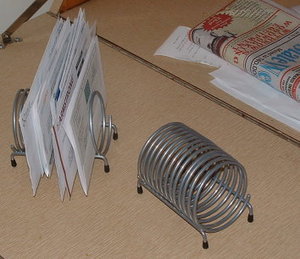
Gather all your supplies: They include a three ring binder (a few dollars at Wal-Mart), several plastic sheet protectors that I had left over from the last organizational project, a permanent marker, two bill dividers (see attached picture, about $3 each at Wal-Mart. I like the ones that look like springs), a calender, and a few ink pens.
The Setup
Step 1: Make a place in your home where you do all your financial related work. Mine is in my kitchen in an old secretary that belonged to my husband’s grandmother. It’s easily accessible, opens to give plenty of space for writing, and closes to keep the unsightly paperwork out of the way. I has a shelf below the writing surface where I keep my three ring binders. Next to this area I have a paper shredder so that I can immediately shred the garbage and be done with it. I also have the secretary desk stocked with paper clips, post-it notes, ink pens, a stapler, envelopes, stamps, and any other office supply I think I might need. Once I get started working on bills I don’t want to have to get up fifteen times to track down all these items. Where you decide to have your “financial space” is completely up to you. Just make sure the rest of the family knows that that place is yours and yours alone and not to leave their stuff lying in that area.
Step 2: Now it’s time to start opening the envelopes. As you open the bills and letters throw away all the extra stuff in the envelopes. If you know you are going to pay the bill during this month or the next calender month go ahead and keep the return envelopes. If not toss them, shred them, whatever, just get them out of your way. As you are opening your correspondence organize the invoices by the date they are due. Those due first should be at the front of your pile. If you have any collection notices or things you know you can’t pay right off the bat set them aside. We will come back to those later.
Step 3: Take the bill dividers (see picture, they look like springs laying on their side) and put one on the left and one on the right of your work area. The one on the left is for the bills due during the current calender month. The one on the right is for the bills due during the next calender month. You will also need your calender to complete this step. Starting at the top of your pile place the bill that is due first in the front part of the bill divider. As you place them in the divider record the bill (electric, water, mortgage, sewer, trash,) and it’s amount on the corresponding day on the calender. This way you will be able to find the information quickly and when you are ready to pay the bill you won’t have to search for the invoice. There are several sections in the bill divider so use them to place the bills for that month in the order they are due. Once you have completed the current month, move to the other divider and repeat the same procedure. When you are done all your bills for this month and next will be organized.
Step 4: Keep up the organizational trend. Put the calender on the front of the refrigerator or somewhere that you will see it every day. This will help you to realize that your bills need to come before that new pair of shoes you have been lusting after or that new electronic gadget your husband wants. Part of the money makeover is to live within your means instead of above them and I know I sometimes need a reminder of what I am working toward. Seeing this calender everyday makes me work just a little bit harder. Each day when you pick up your mail from the box take a few minutes to sort through it and and file it in the right divider. Record any new bills that are due on their due dates.
Step 5: I said we would get back to the debt and collections notices. If you have any of these coming in and you aren’t to where you can pay them immediately, and believe me it takes time to get there, follow the steps outlined in How To Organize Your Debt: A Thorough Step-By-Step Guide to file them in your debt binder and on your spreadsheet.
The Paying
Step 1: This is where you will need a binder (if you are using the debt binder system as well get one that’s another color so you know witch one to grab if you are in a hurry), the sheet protectors, and the permanent marker, and perhaps a stapler. In your binder you will need enough sheet protectors so that each monthly bill has their own. It doesn’t matter how small the bill is, if you pay it every month it needs a protective sheet. You may want to include a few extra protectors. I have one for receipts I keep for tax deductible items, one for occasional bills, and one for warranties an other paper work I might need on occasion. Use the permanent marker to write what the bill is on the front side of the sheet protector. You don’t have to do this but I think it helps. Make sure it’s a quality marker that isn’t going to smear.
Step 2: This step may vary a bit depending on how you pay your bills. I usually pay most things over the internet if possible. I don’t have a checking account (yes it’s possible to live without one) so I do have to get money orders for some of my bills like rent and water. It’s not a big deal as I usually just pick them up at Wal-Mart when I am doing my shopping. Under no circumstances do I used a credit card to pay bills. I have cut them all up. I do have a couple of the prepaid credit cards to use for online bill pay. They work like a debit card but aren’t attached to an actual account. In most cases you can have your paycheck deposited directly onto them. Some do have monthly fees so you do have to watch out for that when using these cards. If you write checks to pay your bills try to use those with duplicates or see if your bank has printable copies of the cleared checks available through their website. If you use a money order keep the stub. If you pay online make sure you print a copy of the conformation.
Step 3: Each time you pay a bill place the original bill with a copy of the conformation, canceled check (available online for most banks), or money order stub in the corresponding sheet protector. I usually staple the payment receipt to the original bill just to keep it all together. At the end of the year you will have one sheet protector for each bill with the whole years invoices and proof of payments inside. At the end of the year you can pull all the sheets out of the binder and file them in their protective coverings inside an expandable file with that years tax returns.
I only started using this system a few months ago but it works great. Everything is organized. I can easily find the receipts for any past payments along with their invoices. Going from utter chaos to this system has already saved me a lot of frustration and anger. Just remember not to let the whole process get overwhelming for you. Stay on top of it and keep all your stuff together. The only time it should ever leave the “financial space” is if you have to go to another room to use the computer. If you have a laptop this should not be a problem at all.
I hope this works out for you. Good luck on your journey to financial freedom!

