Soft sole baby shoes are currently the most recommended style by podiatrists. According to the American Podiatric Medical Association, “Allowing youngsters to go barefoot or to wear just socks helps the foot to grow normally and to develop its musculature and strength as well as the grasphing action of the toes.” It’s all of this that bring doctors to recommend that children first learning to walk wear a soft, flexible shoe. Soft sole baby shoes offer the health benefits of being barefoot, but the protection little feet need from rough surfaces and dirty floors.
Health benefits aside, let’s just admit that there’s nothing quite so sweet as a teeny little baby shoe. It’s even better when that shoe was stitched by hand, created with love.
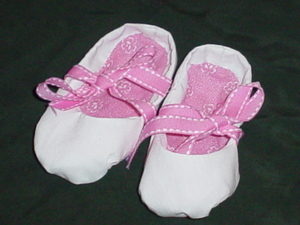
These baby shoes are totally girly, little ballet slippers made for newborns. They’ll last through the first 3-6 months, depending on the size of the baby’s foot and how fast they grow. Using nothing but scrap amounts of fabric and a couple ribbons, these shoes are completely irresistible.
Read through the entire pattern before starting. Some ideas presented may affect your materials list.
Materials:
-2 colors fabric (one color for the outer shoe – or the “shell” – and one color for the inside contrast), less than 1/4 yard – cottons including flannel and broadcloth are perfect. The material must be able to hold stitches sewn fairly close to the edge.
-20-30″ of ¼ inch ribbon
-Embellishing Materials
Instructions:
1. Prepare the Pattern: Print out the pattern pieces, which you can download here. Before printing, make sure that your printer settings are set to “Do Not Scale” or “No Scaling”. This can affect the printed size of pattern pieces. After printing, cut out the pattern pieces or trace them on tracing paper or plain white tissue paper to make pinning the pattern easier.
When cutting – if you will be sewing on a machine, cut around the outside of the panel pieces, creating a seam allowance. If you’re stitching the crown by hand, cut the fabric just inside the gray lines.
2. Cut the Pieces: Place both the shell (outer) fabric and the contrast with right sides together. Pin the shoe body on the fold as indicated in the pattern and cut the body twice (four pieces). Cut the sole once, flip it over, and cut it once again for the opposite foot.
Mark the dots for the toe gather on both sides of the toe (two dots per shoe), and make sure to leave the placement tabs intact.
3. Embellish: Before or directly after sewing the foot seam, embellish the top of foot if desired. The models have no embellishment other than the ribbon.
Embellishment ideas: Use buttons and embroidery to create “country” flowers; Apply iron-on sequins or patches; Sew ribbon flowers; Appliqué; Apply an iron-on transfer.
4. Sew Ankle and Top Seams: With right-sides of one foot’s shell together, sew the back seam. Repeat on each remaining foot. Then, matching placement tabs, place the shell around the contrast, right-sides together. Sew around the top of the foot. Turn out, press seam down so that the top of the foot is flat. Repeat for opposite foot.
5. Sew Body to Sole: Place the shoe body (treating the contrast as the “wrong” side) and sole right-sides together. Starting at the heel, pin the pieces so that the placement points match up. Begin sewing at the heel, working to the first gather mark at the toe. Gather along the toe line to the second gather mark. Finish sewing around to the back of the heel. Clip points and turn out. Repeat for opposite foot.
6. Attach ribbon: The ribbon can be sewn completely around the shoe, over the sole, or you can clip it so that it begins at the seam where the body meets the sole on each side of the shoe. Either way, stitch securely in place and tie in a bow. Gorgeous!