I recently wrote an article about how to dive bomb using your tremolo bar. However, you may not be able to perform dive bombs with your current bridge setup. So here is a guide to help setup your electric guitar tremolo bridge for dive bombs using three simple steps. For the most part you can use tools around your house to get the job done. I should also mention that not all guitars are made the same, so I am using a basic Fender Stratocaster as a base guitar. Your own guitar may vary slightly in its design, but hopefully this article will give you the basic concept to get the job done.
Step one: Adjusting the Tremolo springs
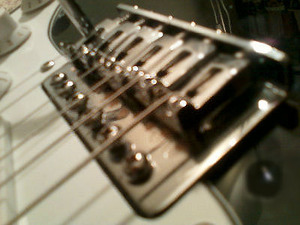
The first thing you should do is loosen and remove your electric guitar strings so that they don’t get in the way while you are working. Now flip your electric guitar over and unscrew the back plate to get to the internal tremolo claw and springs. Different guitars are made in different ways, so if you have four or more springs you will need to loosen and remove the two outside springs so that only the three middle ones remain. You want the three middle springs to be in a triangle formation, look at picture two for an example. If it is already setup this way move on to step two.
To remove the springs you will need to take a standard sized Philips head screwdriver and loosen the two screws holding the tremolo claw in place, this will release some of the tension on the tremolo springs. If you don’t know what the claw is it is that metal plate with the teeth holding the springs in place; again, refer to picture two.
After the tremolo claw is loose (“Very” loose is better than “Kind of” loose) you can take a set of pliers or a spring installer tool (you can buy it from stewmac.com for about $6. There is a link on the right side of this article) and very carefully grab the tremolo spring and stretch it out and remove it from the claw. Cover the other end of the spring with your other hand in case you lose your grip, you don’t want it to slip and go flying off and poking your eye out. A good idea is to use a cloth over your hands so that the springs don’t cut or damage your hands while you are removing the springs and you may also want to put something to protect the body of the guitar so that it doesn’t scratch up the paint. That way even if the spring does slip your cloth covered hand will catch it. Be very careful doing this.
If the tremolo claw was loosened before you started it should remove most of the tension from the springs and it should come out without any problems. After the springs are loose and removed, adjust the remaining springs to match picture two. This setup will allow your bridge to be more flexible.
After that you can move on to the next step.
Step two: Adjusting the Tremolo claw and springs
Now you need to tighten the tremolo claw screws back up, but you want to leave about a 3mm gap between your bridge and the body of your guitar. This allows the bridge to move around when you pull on it with the tremolo bar. If the gap isn’t big enough the bridge will hit the body of the guitar and cause problems, if it is too far the bridge will be too loose and will cause problems. So 3mm is normally safe.
If you need your bridge to have a bit more relief for bigger dive bombs than adjust the back tremolo claw screws accordingly so that it can move about a bit more.
A good way to measure the distance is by tightening the claw screws to the max and then slowly loosening it to where you need it. After you see the 3mm gap, slightly tighten the screws a bit to make sure you don’t have any wobbly screws.
NOTE: Before making any further adjustments I recommend that you leave it at 3mm and move on to step three to adjust the bridge on the front to determine how much more relief your bridge needs to perform dive bombs. If you mess with the tremolo screws and bring them out too far you may have negative effects later.
After you have the tremolo screws set, put the back cover back on your guitar and flip it on to its back to see the front of your bridge plate.
The 3mm gap should be clear to see now. There should be about six screws on the front of your bridge plate holding the bridge in place, if not you may only have two screws. Guitars are made differently so I’ll try to explain both. Either way, you need to adjust those screws so that the bridge can bend forward and backward when you perform a dive bomb.
For the six screw setup, loosen the four middle screws by about 1.6mm above the bridge plate using a Philips head screwdriver. 1.6mm is hard to measure but you can just eyeball it. The round part of the screws should hover just above the bridge plate slightly, perhaps two or three full turns loose will do.
The two outside screws should remain screwed all the way in tight. The reason for this is so that the outside screws are holding the bridge in place and the middle screws are loose enough for the center of the bridge plate to pivot forward to dive bomb, while the loose springs in the back are allowing enough slack for the bridge to wiggle about. If it is too tight you will be forcing the springs in the back and the bridge plate screws to pull forward and you could damage the guitar.
If you have the two screw style guitar, you will still need to loosen the screws, but since they are the only two screws holding the bridge down you only need to loosen them a little bit using a flat head screwdriver. For some people loosening the tremolo claw is enough to pivot the bridge and they don’t need to mess with the screws.
For both bridge styles you need to test the setup based on your playing style to get the dive bomb sound you are looking for, so put the strings back on your guitar and tune up to pitch and test it out. If it needs some adjusting just follow the above steps to either tighten or loosen the screws and springs to get the setup you are looking for. Only make minor adjustments to find the perfect settings.
People set their bridge up differently, so for more information on this you can check out the Fender official website and read the guide on the right side of this article.