High-quality jewelry displays for craft shows and trade shows can be expensive, but it’s surprisingly easy to make your own. This one uses a cheap Evenflo baby gate that, after much abuse, finally had a crossbar snap. A gate of the exact type costs about $20 or less. Even if you buy a brand new baby gate to disassemble, a pair of standing jewelry displays still costs about $40 to create.
I came up with this idea after one of our baby safety gates broke, and I can’t stand to throw things away that might still be useful. Since I only bought the C-clamps and S-hooks at the time, it cost me about $20 out of pocket. If you don’t already have the rest of the materials lying around, the cost runs closer to $40-$50, depending on the prices in your area. However, bear in mind that large jewelry displays similar to this may cost up to $100 apiece, and you get two for the price of a half and a little bit of time.
Suggested materials
Here is the list of materials that I used for this project, but feel free to tweak it however you like. This design provides a basic template that you can easily customize according to your style and needs. Each display takes about an hour and a half to assemble. Material numbers assume two displays.
Tools:
- · Hot glue gun
- · Multi-temp glue sticks
- · Awl
- · Power drill
- · Wood saw
- · Clothespins or similar clips
Display materials:
- · Evenflo wooden safety gate (or gate of your choice)
- · Fabric of your choice, approximately 2 yards (cotton or cotton blend)
- · (4) 4″ C-clamps
- · (72) ¾” S-hooks, if spaced as suggested
Assembling your jewelry displays
- 1. Remove the rivets. Use the power drill with a bit as close to the size of the rivets on the gate’s crossbars as possible. With a low-speed, high-torque setting, drill out the rivets that hold the crossbars on the gate. Next, drill the rivets that hold the brackets on the crossbars. If desired, you can also drill out the rubber pressure pads on each side of the gate. For the example in the picture, I left these pads in place. Removing them gives you a smoother top line.
- 2. Cut your fabric to size. Look at your gate panel. The side with the pressure pads is the top of your display, and the side with the brackets that held the crossbars is the bottom. If those brackets are still in place, they are on the back of your display. Position your fabric so that it completely covers the front with about 1/2″ extra. Wrap over the top and down the back. Cut the fabric to size on the back, at a length where the back edge covers to the bottom of the panel frame but leaves the protruding legs exposed. The fabric should overlap each side by about 2″.
- 3. Cut your crossbars. If both of your crossbars are intact, you can use them as-is for your display. This will give you a solid bar across the back of each display to which your C-clamps will attach. Because the gate I used had a broken crossbar, I used a wood saw to cut four one-inch pieces out of a crossbar. Make absolutely sure that you cut straight! Slanting edges on these pieces will cause the C-clamps to try to slide off when the display is set up for use.
- 4. Attach clamp pieces. The entire crossbar fits perfectly between the brackets at the bottom back of your display. If you’re using this option, you can now hot glue the bar securely to the back. Make sure that the bar is perfectly flush with the bottom, ensuring that it will sit flat on the tabletop when the display stands up. With 1″ pieces, you can glue one to each leg, nested inside the brackets and flush with the bottom.
- 5. Attach your fabric front. Put a small amount of hot glue on one leg of the gate panel, gluing one edge of the fabric to it. Make sure that you leave the 2″ of fabric to the side. Stretch the fabric across and glue the edge to the other leg, making the edge as straight between the legs as possible. Stretching the fabric as tight as you can, glue it tightly to the top of the panel frame. Now your fabric is attached at all four corners, stretched tight, with the fabric on the back falling free.
- 6. Finishing the front sides. Once your fabric is anchored, you will finish gluing the front. Run a line of hot glue down one side of the frame, attaching the fabric in as straight a line as possible as you go. I find it easiest to lay about an inch of glue, then carefully pull the glue over it and let it cool. Repeat until the entire side is smoothly attached. Attach the other side in the same way, stretching the fabric as you go to make it as smooth as possible.
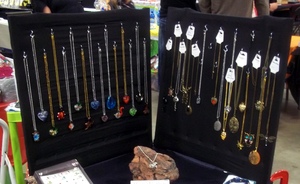
- 7. Glue the front top and bottom. After the sides are attached to your liking, repeat on the top of the frame, again stretching as tight as you can. Turn the panel over and carefully inject hot glue between the fabric and the bottom bar of the panel frame. Note that the display on the left in the picture looks slightly less neat and smooth than the one on the right. That’s because I forgot to tack the bottom bar before proceeding. Do not skip this step; it does make a very big difference in the overall appearance of your display.
- 8. Poke holes. Using a clothespin or other clip, fasten the fabric at the top of the frame to keep it out of the way. Poke the awl through the fabric (from front to back) at a point that it rests in the bottom part of a diamond in the grid on the gate panel. This gives added strength and stability so that you can hang anything on it. Keep the awl in place with one hand, and put hot glue around the back of the hole with the other. Use a fingernail or other flat object to push the glob of glue against the fabric, ensuring that it also adheres to the gate panel grid. Carefully turn the awl until the glue cools completely. Remove the awl. This leaves a perfectly round hole that will not fray. Poke one end of an S-hook through the hole. Repeat over the entire panel, spacing the hooks as desired.
- 9. Finish the back. Remove the clothespins, and glue the fabric to the back of the frame just as you did the sides. Stretching isn’t as important on the back, but make sure that it is smooth. Trim the back of the overlap on the sides, leaving the front intact. Pull the overlap back and glue it to the back of the frame, over the first layer of fabric. Trim the edges.
- 10. Repeat for the second panel. For your second display, simply repeat steps 1-9. When you’re done, stand the displays upright on the tabletop and fasten to the table edges with C-clamps. If you have difficulty adjusting the clamps, use some machine oil on the bolt until they move smoothly.
That’s it! You now have a standing all-purpose jewelry display that creates a perfect backdrop to your tradeshow table. The S-hooks can be moved around wherever you need them, making this display perfect for virtually any type of jewelry. I use this display for necklaces, bracelets, and earrings on a hang card. While traveling, I always remove all of the hooks so that they don’t get lost or poke through the fabric.