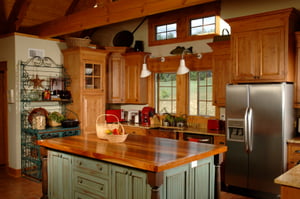
Social scientists don’t always agree on family dynamics, but the benefits of quality time — spent together — can’t be ignored. The cook top island you envision can bring people together and encourage conversations when there are no walls and barriers to impede interaction. Share news. Make plans. Recruit kitchen helpers easily when you add a cook top island. Whether your design is simple and practical or loaded with bells and whistles, your kitchen can become a popular hub for family and friends once it’s installed.
1. Sketch out your idea of the perfect cook top island using magazines, books and visits to home improvement stores so you get the lay of the land. Don’t hesitate to “borrow” design ideas.
2. Assess the amount of space at your disposal. Get the height right: Islands typically range from 28-to-48 inches high. Rethink the project if your kitchen measures 8-by-12 feet or less, as you’ll limit space so seriously, you could find it difficult to open drawers and cabinets.
3. Compare prices on cook top stove units using a reputable source like Consumer Reports magazine. Expect gas cook tops to cost more than electric ones. Check out glass and ceramic cook tops and specialty grill units for aesthetics and versatility. Purchase your cook top from a local merchant so if there’s a problem or you need service, the retailer is close.
4. Order prefabricated cabinets to create a base for your island if you’re starting from scratch. If money is no object, order custom-made units from a craftsman with a solid reputation for quality work.
5. Run electric and/or gas lines to the island site so the cook top’s infrastructure is in place before cabinets arrive. Add plumbing if you’re planning to include a sink in the island and there is currently no plumbing in place.
6. Frame up the island space using 2 x 4 sections of lumber. Anchor the frame to the floor with heavy-duty screws or bolts or you can allow the weight of the cabinets/countertop to hold the island components in place if you don’t want to drill into the floor.
7. Install the cabinets, drilling holes where necessary to feed electrical wires and/or gas lines into the cabinet’s interior in preparation for hooking up the cook top. Add drawers, cabinet fronts and decorative hardware.
8. Choose a counter top. Have the range cook top on hand when the island is measured so the manufacturer can cut the opening to the exact size needed to seat the range into the island.
9. Remove a ceiling section directly over the cook top to insert a vent and hood. Connect the wiring that controls an exhaust system that features an “updraft” vent style. Some homeowners like a second exhaust fan. While everything’s exposed, you can modify ceiling lighting, too.
10. Re-plaster, sand and paint the ceiling once the exhaust hood is installed. Place the countertop on the island, sealing it with the medium recommended by the manufacturer. Seat and seal the cook top unit into the hole and connect up the electric and/or gas connections and controls.
Reference:
- www.thisoldhouse.com/toh/article/0,,599050,00.html
- www.geappliances.com/design_center/design_library/add_an_island.htm
- www.remodelingmyspace.com/kitchen/kitchen-islands/photos-kitchen-island-design-ideas.