Ease of Use/Performance: 23/25
Convenience/Storage 23/25
Appearance/Design 24/25
How much I enjoy 25/25
Total: 95/100
You can be your very own barista and brew your own espresso and cappuccino with the Capresso Mini-S Espresso/Cappuccino Machine. The Capresso Mini-S is an easy and fun way to make great tasting espresso and cappuccino.
The Capresso Mini-S uses pressurized steam to force the hot water through the grounds filter holder and filter. The small pot is no joke, that is all it makes, but it is so good. Until I received the Capresso Mini-S I had only had cappuccino and espresso from places like Starbucks and other coffee shops. Brewing or drawing your own is not difficult and with the right tools and the right beans you can have excellent espresso, cappuccino and lattes any time.
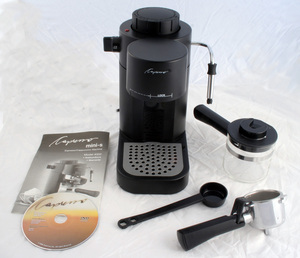
The Capresso Mini-S comes with the machine which consists of the base unit, the filter handle assembly with flip holder for the metal filter, the metal filter, the nozzle that comes off for cleaning, the little glass carafe, the boiler cap and a plastic drip tray. There is also a nice manual with step by step instructions and even a DVD to show you how to brew and use your Capresso Mini-S.
The Capresso Mini-S features and How Things Work from Capresso:
Features & Benefits:
Boiler cap with built-in safety valve.
Patented 3-way safety switch allows you to choose between full pressure for brewing espresso and maximum steam output.
Dual frother lets you steam or froth milk either in a pitcher or right in your cup.
Instructional video shows you in three easy steps how to produce espressos and cappuccinos.
How Things Work:
The steam boiler principle of the Capresso mini-s heats up water and then starts forcing the hot water through the filter holder and brewing espresso coffee into the glass carafe. During this time steam starts collecting in the boiler. When the coffee has reached the steam marking on the glass carafe, you can stop the brewing and switch to frothing milk. At that time the machine has created maximum amount of steam. When you finished frothing turn the selector switch back to the coffee brewing position. Important: To avoid a burnt coffee taste, stop the brewing before all the hot water has passed through the filter holder. Watch the video clips to see how easy it is.
The right beans and grind make all the difference in the espresso game and you do have to spend some money on this. Using regular ground coffee just does not work; it comes out way too weak and seems a big let down. Using a finer ground coffee and grinding your own with a small grinder is much better as the espresso and cappuccino will taste much better, its fresher. All joking aside the beans do make the difference, I tried using regular ground coffee from a can and this came out very weak and did not taste like coffee or espresso.
I went to the store and found the grind your own whole bean section that I had lately tried my hand at and found some espresso roast ground bean and whole beans. I tried both and found the beans are much better as it gives a fresher and richer taste than stuff that has been ground who knows when. So the first stop in your espresso shopping trip is a nice dark roast coffee bean like espresso or other dark roasted beans.
Another thing I have found over the internet is you should burr grind your beans, I will get back to that in future articles as I am currently trying to get a burr grinder for this. I have a blade grinder and it does make a bit of a mess in the finely ground, almost dust, that it puts out for some of the coffee bean grinding. Until then I will muddle through with my blade grinder and grind my own beans. Before your first use you should rinse out and run a carafe of water through the Capresso Mini-S to rinse out the insides. This also gets you some practice with the machine and gets things nice and broken in.
The Capresso Mini-S uses boiling water and pressure as it mentioned in the paragraph from the company to force water through the ground beans. This creates a richer tasting and much stronger coffee than a drip maker; they called it espresso way back when. The Capresso Mini-S is a very easy to use machine and just a little care and caution is needed due to the steam and pressure.
The black cap that you screw on after pouring the water in has a seal that fits tightly on the tank and boiler for the machine. This is how the steam creates the pressure for the Mini-S to make your espresso, the hot water creates steam when it boils and builds up pressure in the tank. When the pressure has built up to a certain point it forces out through the filter or the frother tube depending on the switch position.
To use the Capresso Mini-S you fill the water tank from the small pitcher, turn the switch to the cup and wait a couple of minutes, don’t leave. This happens fast, only two or three minutes, and you need to stick around so you don’t burn your espresso. This sounds funny but is very easy to do and you will see why the first time you use your machine.
The grounds are dry when you start, the steam is forced through it and as the boiler continues to boil the water into steam and force it through the grounds it will burn the grounds. The water is continuing to heat and the grounds can only take so much of this so you should turn off the switch and pull the little pot out when the first wisps of steam start coming out from the sides of the filter and the whistling starts.
This starts the burning process of the grounds and gives you a very clear sign of when to stop the espresso process before the burnt and bitter taste gets into your espresso. If you continue you will taste the burnt coffee and grounds in your espresso and it even smells bad. All you have to do is turn the switch to the off position when steam starts to rise from the edges of the filter holder. The whistling will start very soon after the steam and this is a sure sign that time is up for this brew of espresso.
While brewing to make a cappuccino or latte you simply pause the brewing and use the nozzle for steam by turning the switch from the cup symbol to the steam symbol with a cup under the nozzle in some milk. You should set the milk in a cup or small pitcher while you are getting everything ready and before you start the brewing so you don’t have to hustle while the espresso is brewing. The process happens quickly and you don’t want to ruin a perfectly good cup of espresso or cappuccino by rushing.
All you have to do is wait for the espresso that is dripping into the pot to reach the small line and steam symbol on the glass and turn the switch to steam. Again you have to have the cup or pitcher under the nozzle so that steam doesn’t start scalding your counter.
When you turn the switch to steam, steam that has built up inside the tank will start to come out the nozzle and you want your cup under it and in the milk. The up position of the nozzle is for injecting the steam into the milk and heating it up. When the milk in the cup or small pitcher is hot you can froth it by pushing the nozzle to the down position and this will froth the milk into foam.
After you steam or froth and you want to remove the cup from the steamer nozzle you should turn the switch to the off position, if you don’t the steam will spray into the cup when you pull it back from the nozzle. For a latte you simply steam the milk and for a cappuccino you froth the milk after steaming.
The steaming to heat up the milk takes about twenty seconds or so and frothing takes another twenty seconds. The steam is very hot and the tube will burn you so be careful around the Mini-S. Once you have the milk steamed and frothed to your liking you switch off the Mini-S and turn the switch back to the brewing cup position and let the brewing continue until the steam starts.
For your regular espresso you skip all the frothing stuff and just let the rich espresso coffee brew until the steam starts and shut it off. The espresso is very good and makes about two to four one ounce cups; it’s very strong coffee so a little goes a long way. This is a perfect treat for after dinner or a great pick me up any time of the day.
Using the frothed milk you can create some great drinks and the experimentation is really fun. You can try doing some different things like using chocolate milk instead of regular milk for a great chocolaty cappuccino or some of those flavored creamers or add some syrups for coffee after the brewing. I have tried several different things like steaming and frothing the flavored creamers and this works very well for a nice tasty cappuccino.
Okay so we have how to make espresso, cappuccino and latte’s to your heart’s content. It’s pretty easy just add the grounds into the metal filter and place the filter into the machine, turn and lock into place. Add water, turn selector switch to cup symbol and let it brew. For lattes and cappuccinos simply pause the brewing and steam and or froth the milk you have waiting.
When sufficient froth and hot milk is ready continue brewing your espresso and when done, steam coming out filter and whistling starting, move selector switch to off. Now what to do about all that steam and pressure after you enjoy your coffee.
Once you pour your espresso into cups or into your steamed milk you simply turn the switch back to brew and get rid of the rest of the water through the filter. This will burn the grounds and such but you need to get rid of the steam and water anyway. You run the rest through into the pot, you have to put that back before you start the brewing again.
You will also want to get rid of the last bit of pressure by turning the switch to the nozzle and steam setting with a cup under the nozzle. This will release the last of the steam and you can open the cap. I usually just let the rest of the water run through the machine while I get my spoon and the cappuccino ready for my enjoyment. Then place the little pot under the nozzle and switch to the steam to get rid of the pressure, then dump the bitter brew from the last of it out and do a quick cleanup.
Then I get to sit down and enjoy my espresso or cappuccino, and I really do. It takes longer to read this article than it does to brew a really good cup of espresso so don’t let my long winded explanations scare you. From start to finish I have been able to brew a few cups of really good cappuccinos in about ten minutes, that’s getting everything out like the milk, cups and grinding the beans along with the three or four minutes of brewing.
The brewing process will take about two to three minutes to start having the steam and boiled water coming out the filter and only a minute or two more to start the steam coming out the sides and the whistling. So don’t leave even for a few seconds to go do something else while you’re brewing. By the time you get back your espresso will be ruined because you let the grounds burn and the last of the water went through the burnt grounds. Yech.
It really is easy to brew a great cup of espresso or really good cappuccinos with the Capresso Mini-S machine. I have found that really good beans and grinding your own make a big difference in the taste and when you do grind your own only grind enough for that use, the fresher the better.
I also try some different cappuccinos and lattes using the flavored creamers and syrups that are really good. Sometimes some things don’t work but for the most part we have fun and really enjoy a home brewed cappuccino and latte. I really enjoy a good espresso but the rest of family is more into the great tasting and frothy cappuccinos.
The Capresso Mini-S Espresso/Cappuccino Machine is a great way to have home brewed or drawn espresso, latte and cappuccino. The machine is very easy to use and quickly cleans up. It is a great way to have coffee house brews in your very own home. I highly recommend the Capresso Mini-S as a kitchen gadget that works exceptionally well.