Children invite us to share with them and enjoy the season in meaningful ways: making a snowman, preparing homemade gifts for family and friends, assembling a big jigsaw puzzle, reading a story together. In spending time with our kids we are given the opportunity to savor what is precious to us, and we’re put back on the right track. Be sure and read the classic tale of Frosty the Snowman to the kids in your life this season, and if you can make a snowman.
Snowmen art projects are easy to do so here are a few of some snowmen that we have made.
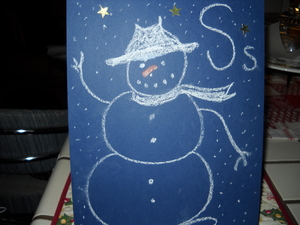
Let’s Make a Snowman
Take a big piece of colored construction paper, blue, green, red, or anything a dark. With white chalk draw three circles one on top of the other with the smallest on top and gradually getting larger. This of course is his body. Give your child a piece of chalk and see if they can imitate what you are coloring on their snowman body. Draw a hat, face, minus the nose, a flowing scarf, buttons, scrawny arms and some big boots. Attach a couple of gold stars up in the sky along with falling snow. Add a small, carrot shaped piece of orange scrap construction paper for a pointy carrot nose; fold it so it pops up.
Snowkid
Make a snowkid if you live in the snow using snowballs. Gather all the little pieces to complete the snowkid. Use pipe cleaners for arms, marbles, or small rocks for buttons, eyes and mouth, a red ribbon for his scarf and an old dish towel with yarn wrapped around it for a floppy hat. Poke an orange crayon in for his nose. Store all of the pieces in a baggie so you can use them again.
My Chubby Little Snowman project is fast and easy, and has a cute poem to go with it.
Snowman Puppet
You’ll need: White construction paper, scissors, crayons or water colors, orange pom pom, and white lunch bag.
1. On white construction paper outline a big snowman head with a black marker with a big top hat on his head. Draw a face with the mouth separate from his eyes and nose.
2. Color or paint the hat, and cut out both pieces (his head with hat and then the mouth).
3. Attach these to the bottom of the paper bag so that the mouth sits under the flap of the bag and the rest of his face and his hat on the top of the flap. When you put your hand in his mouth will open so he can talk.
4. Decorate the bag with crayons, or paint and make a cute scarf and buttons on his body.
5. Attach an orange pom pom for a cute carrot nose.
Sources: Prime Time together with kids:
http://www.discoverytoysinc.com/web/guest/home
You can make it:
www.highlights.com

