As a mother of two young children, who runs her family on a tight budget, I find most of my furniture at yard sales and second hand shops. As most people know, new furniture is very pricey, and an investment most people can’t dive into, especially when living on a tight budget.
The key to buying used furniture is seeing its potential beneath the chipped paint and missing knobs. If the components are all sound, and the structure is solid, you’ve got a great piece of furniture with just a little work from you at home.
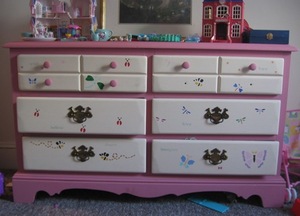
My most recent furniture refinishing project was my children’s dressers. Both of these were bought at yard sales, and where in desperate need of touching up. I decided to repaint them, and with a few additions, make them better than new.
Now, I am by no means an expert in painting, woodworking, or home repair. Believe me when I say it: If I can do it, you can do it! Just follow the same steps I did, and you can have a dresser that your kids will love, and you’ll feel great about.
Step 1- Choose Your Colors
It’s best to try to choose the colors you want before you go to buy the paint. This will keep you from getting overwhelmed by your selections when you get to the paint store. I chose a nice subdued rose color, with light beige drawers for my daughter, and a deep green with light beige drawers for my son’s dressers. This way, when I arrived at the paint store, I new exactly what I was looking for, which kept me from getting frustrated and wasting time.
Step 2- Picking out the Paint
Make sure you get a knowledgeable sales person to help you select the type of paint you need. There are several kinds out there, and you want to be sure you get the right one. Make sure it’s an indoor paint, one that stands up to wear and tear, especially important in a child’s room. A one coat only type is also nice, though you’ll probably find you’ll need more than one coat in the end.
The finish is also an important element. I’d suggest a matte finish for furniture. This is a nice touch, as glossy finishes tend to look a little cheap. Matte finish also helps hide any imperfections in the wood or your paint job.
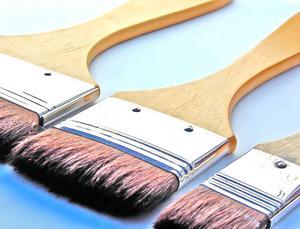
Step 3- The Supplies
In addition to paint, there are also a few other basics you will need. Make sure you get sandpaper, for taking the current finish on the dresser, a drop cloth, for protecting the surface your painting on, and of course the brushes (don’t laugh, I almost forgot them myself). A basic mask that covers the nose and mouth is also important to have for the sanding process. Varnish finishes especially are bad to breath in when it’s flying through the air.
I also chose to pick up some basic stencils to make designs on my dressers, butterflies and cute bugs for my daughter and frogs for my son. Stenciling is super easy, even for the novice, and a great way to add fun elements to your dressers. Make sure you pick up stenciling paints, and small brushes or sponges if you choose to do this as well.
Step 4- Sanding
Ideally, you’ll want to do your sanding and painting outside, as it’s open and well ventilated. If you’re blessed with a nice day, lay your drop cloth in the driveway, and go to town. If this is not an option, make sure your workspace is open, well ventilated, and pet and child free.
In order to repaint a dresser, you do not have to take the old paint or finish off completely. All you have to do is make sure you “rough up” the surface of the previous finish with large grain sandpaper, making sure there are no smooth patches left when you’re finished. Take a damp sponge and wipe off all surfaces, making sure they’re free of dust, and allow surfaces to dry. Look over your work and make sure none of the surface is still smooth.
Step 5- Painting
Once your surfaces are sanded, cleaned and dried, you’re ready to paint! Open only the can of paint you’re going to be using immediately. Stir with the stick the paint store provided, making sure to go slow and steady, scraping the bottom, and working out and lumps or color steaks. Once that it done, you can either pour off a small amount into a paint tray, or choose to paint right from the can.
Dip half of your brush into the paint, removing excess on the side of the paint container. Your brush shouldn’t drip, but it shouldn’t be bone dry either. You’ll learn the right amount as you begin to work, trust me.
Paint your surfaces in long, even strokes, all going in the same direction. Don’t panic if they look choppy- it will look better as it dries, and you can always go over it with a second coat. Cover all surfaces evenly, checking for drips, especially on those pesky corners.
Allow the first coat to dry according to the paint specifications, usually around two hours. Go over your work and decide if you need to apply a second coat. This is usually a good idea. Always cover your paint and clean your brushes when you’re done working, even if it’s only to take a short break.
Step 5- Finishing Touches
It’s the little things that really make a simple project look great. For instance, I replaced all of the knobs on my children’s dressers in addition to painting them. There’s a HUGE selection of knobs and dresser fixtures at Lowe’s and Home Depot at very affordable prices. I chose to buy simple wooden knobs and paint them to match the dressers. But, you could also buy decorative pewter knobs or fun shaped porcelain knobs. Go crazy! Installing them only requires a screwdriver and a simple flick of the wrist.
As I mentioned earlier, I also chose to add simple stencils on the drawers of my children’s dressers. These were easy to do. Stenciling kits can be bought at a local craft store, hardware store, or even Wal-Mart. They usually include, paint, brushes or sponges, and easy to follow directions. This is a great way to add fun elements to your projects.
These instructions can be applied to repainting any furniture for any person, children and adults alike. The more you practice, the better you will become. I chose to start with children’s furniture however because kids are less judgmental if your work has some imperfections, and are always super appreciative of new and exciting things.
So, be sure to use these simple steps to transform your great secondhand finds into shiny, new, unique pieces of furniture, custom made to fit your tastes and lifestyle. Like I said, if I can do it, you can do it!