Parts:
1 12 volt air compressor from junkyard
2 Pressure switch from an air compressor or a well pump
3 Holding tank
4 Threaded fittings, hoses / tubing, hose clamps
5 Electrical connectors, wire, fuse, switch, relay
The heart of the system is the compressor itself. You don’t have to spend big $$ on an aftermarket compressor like an ARB. You can find a similar compressor in you local junkyard and they are very easy to remove. In my area they go for about $6. Grab your 3/8″ socket set, extension, swivel, and wire cutters. Bring some sort of 12v battery to test the unit before you go through the trouble of pulling it out of the donor car. I have even used a 9.6v radio controlled car battery. It does the job and it’s easier to carry than a booster pack. Look for an old Lincoln or Cadillac with air shocks in the back. You know the cars that you sometime see driving around with the rear bumper dragging on the ground. The compressor should be bolted to the fender under the hood. It’s mounted to a small frame with rubber bushings. Remove the frame from the fender, not the compressor from the frame. Most of them have a few wires. Locate the wires coming from the motor, they should be the heavier ones. Test the compressor. You can ignore the other wires. Cut the small white plastic air line, but leave it as long as you can.
You need a way to limit the pressure. The best way is to use a pressure switch for a well or a compressor. Don’t let anyone tell you that the switch will not work on 12 volts because it is made for 110 or 220 volts. It WILL work just fine. Inside the switch is a spring loaded contact. When the pressure drops the contact closes and the power flows. The switch is built to handle many more amps than we need. I picked up my last switch from the plumbing section at Home depot. They had one set for about 30 psi for $20 and one for about 60 psi for $25. They are the same switch. Pop off the plastic cover and look for bolt inside of a spring. There is a nut and washer on the bolt. If you run the nut down the bolt it puts more pressure on the spring and raises the cut out pressure for the switch. You can adjust it after it’s built. You might be able to salvage one from a discarded 110/220 volt air compressor. Most pressure switches have two sets of contacts. I like to split the wire and use both sets in case on should fail. In other words the contacts are wire in parallel.
The cheaper way to limit the pressure is with a regulator. Plumb it into the system so it can vent to the atmosphere. Switch on the compressor and wait for the pressure to rise. When it exceeds what the regulator is set for it will vent out and keep the pressure from rising. The down side is that the compressor will continue to run and not turn itself off as it would if you used a pressure switch.
Any small tank can work. I have used a scrap length of 3″ or 4″ PVC pipe and an old CO2 tank from a beermiester. Anything can work as long as it will handle the pressure safely. I have used store bought fittings to make all of the connections and I have used a tap to make my own. For example, You can glue caps on the PVC pipe, drill and tap 1/4″ npt threads into PVC and screw in a hose barb. I like to drill it on the side of the cap where it overlaps the pipe because the plastic is thickest there. Using a tap saves money by reducing the number of fittings needed, but it adds a few more minutes to the project.
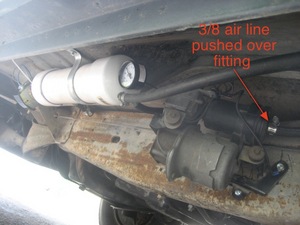
I have plumbed the air line two different ways. I have used compression fittings and threaded brass bushings to adapt the stock air line up to a standard 3/8″ rubber line on a unit that I planned to run at 100 psi. Look for the small compression fittings at your local auto parts store. They are used to install aftermarket oil pressure gauges. You might not find them at the hardware store. I have also removed the stock air line from the compressor, slid a 3/8″ rubber line over the plastic nipple and secured it with a clamp. It’s not made for the hose, but it hasn’t leaked so far. I only run that unit at 60 psi. 60 psi. is enough to air up a flat and get off the side of the road. The compressor easily puts out that pressure. I have an air horn on the 100 psi. unit. You can hear the compressor work harder around 80 or 90 psi. and starts to get hot at 120-130 psi. I know that 100 psi. is asking a lot from the little compressor, but it’s held in there for 4 years so far. I figure if it burns up, it doesn’t owe me anything. I’ll gladly spend $6 to replace it. You can install a cheap gauge to monitor the system or just plug one into the air line to adjust your pressure switch. If you wanted to get fancy you can install a gauge on the dash, but I just put mine at the tank.
Plan on this thing drawing about 30 amps to be safe. I used 12ga. wire, 30 amp fuse holder and a 30 amp switch. You could use a smaller switch if you run it through a relay. An aftermarket fog light installation kit from walmart should have everything you need or you can do it the cheaper way by cutting a relay out of a late model car while you are in the junkyard. Any newer car will have several 30-40 amp relays. Take a couple and have spares.
I had the idea to mount the compressor and tank on a short piece of 1X6 lumber to make a portable version. It would have a long cord and a cigarette lighter plug or clips to attach it right to the battery. It would be completely portable if you mounted a small 12v battery to the board. Home depot has batteries for emergency exit signs in their lighting section.
These little compressors are very handy handy for small jobs like filling a tire or an air mattress or blowing out a clogged fuel line. You can install an air fitting at both bumpers or just make sure that the air line you carry can reach all of your tires. The tires on my truck run at 85 psi. but 50 is enough to get me off the shoulder and to service station. Don’t expect it to run an air grinder, but hey, what do you want for $35 or so in parts and a couple hours work. Another advantage is that it can be mounted in several different location on the vehicle. You might be able to fit the compressor under the hood and mount the tank under the car or in the trunk. Be sure to check out all of he photos with this article. Click the icon on the top left corner of the photo to view the other photos.