Graphic Designers are beginning to focus on every aspect of the digital medium, including web design and Flash animation. If you’ve ever been asked to create a banner ad or short animation for a client whom you have previously only offered print designs, this tutorial is very beneficial. For the experienced Flash animation designer, this is definitely too basic for your skills. Creating SWF format animations in Photoshop and Image Ready is actually very simple, and whether you want to turn a static ad into an animated ad, or would like to watch a cartoon hand wave back and forth on your web page, these tools are capable of accomplishing this.
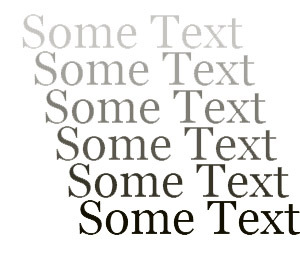
In this Tutorial, I’m going to explain how to create a simple text fade in animation, saved as a SWF file (Flash file) using just Photoshop and Image Ready. I will also show you how easy it is to export your SWF animation and put it in your website. Although I’m using a very simple example (text fade) you can use these steps to accomplish any type of animation.
1. Open your Photoshop program, and click on “window” in the top menu. Make sure you click on the “animation” window, so that you can see the frames of your animation. You will see a long thing “animation” frame window appear at the bottom of your working space.
2. Create a new file, the size of the animation that you wish to produce.
3. Create a new layer, and do not type any text that you wish to fade. If you have some design elements that you want in the background of the text, or say, a background color that needs to be present before the animation initializes, go ahead and create those styles in this layer.
4. After you’ve created your blank (or somewhat styled) layer, go to your animation window, and click on the little arrow on the top right of the animation window. A menu box will fly out to the right, and select “new frame.”
4. Create a New Layer, and type in the text that you wish to fade in. You can then style the text however you wish: bevel, emboss, drop shadow, change the color, gradients, etc. This layer should have the text, style and look that you want present after the fade is finished.
5. Now you will see the text in both the first and second frame. But, you only want the text in the second frame. So, to achieve this, click on the thumbnail in your animation window of the first frame. Now, hide the layer with your text on it, only within this frame.
6. By now, you should have two frames. The first frame is an empty canvas (or, styled however you chose in step #3) and the second frame with your text in it and any additional elements that you want present when the fade is finished.
7. With these two frames open, and with the second frame selected, click on the icon that looks like many circles overlapping, located at the bottom of your animation window. If you roll your mouse over this icon you will see the label, “Tween.”
8. A dialogue box will appear with options for your tween. The drop-down menu for the label “tween with” should say “previous frame.” “Frames to add” will default to 5 frames, this will be fine for a simple fade animation. But, if you want to fade to be longer, add more, if you want it to be shorter and choppier add less. These other options should also be selected:
a. All Layers
b. Position
c. opacity
d. effects
9. Click “ok.”
10. You will notice that Photoshop has added 5 frames, fading from your original empty frame, to the final text frame. To preview your animation, click the play icon at the bottom of the animation window and you will view your entire fade animation in action!
11. Some options that you can adjust to get different fade effects are available. One, is the second’s option. Under each frame in the animation window, it should be at a default of “0 seconds.” Adjust this to .5 seconds or 1 second, and preview it using the play icon. This is up to your discretion, however you want the animation to look.
12. Now, to save it as a SWF file, which is the standard Flash format for animations, you need to bring it into Image Ready. Go to “File” and then scroll down to “Edit in Image Ready.
13. You already created the animation in Photoshop, so now you only have to export it as an animation. Go to “File” scroll down to “Export” and choose “Macromedia Flash SWF.”
14. In this dialogue box, you can choose “Generate HTML.” The other options can be left at their defaults, but they are self explanatory if you need to change any of them.
15. Export! You’re done! You now have an HTML document with the Flash animation inside it, and a separate SWF file that you can embed into any other HTML document quite easily.
These instructions are for beginners, and illustrate the steps in creating a very, very simple animation. The “Tween” effect can be applied to any two images, or a blank canvas to an image, or any other use your imagination can come up with. Basically, it creates its own frames based on a beginning point, and an ending point. Have fun, and use these simple guidelines to create more dynamic animations of your own!


