You know the material with pretty pictures used for quilts and pillows? No one needs that many pillows and quilts. Instead, frame the pictures with homemade frames. Make frames out of cheap foam board instead of hunting for an expensive frame the same size as the picture. Each frame takes about an hour to make unless you are quick at perfect measurements. If making the frame for a kid’s room, get them to help.
What You Need:
Material panel
Foam board
Poster board
Pencil
Scissors
Utility Knife
Glue
1) Cut out the picture you want to frame from the material. Cut 1-inch from the edge of the picture all the way around. Most of these panels are “framed,” so cut 1-inch from the edge of the frame.
2) Measure the material picture to determine the size of the frame. Do not include the extra 1-inch for this measurement. Only measure what you want to see when the picture is framed.
3) Add 3 inches to the measurement of each side of the picture. The 3-inches becomes the width of the frame. You can have a smaller or larger frame, if you like. Make sure it is at least 1-inch.
4) Cut out the poster board to the measurement from Step 3. This means that the poster board is 3 inches larger than the picture on all sides. Got it?
5) Center the poster board on the backside of the foam board. Trace around the poster board. Use the ruler to guarantee straight lines.
6) Use the utility knife to cut the foam board following the lines you drew. The foam board is now the same size as the poster board.
7) Draw a vertical line from the top to the bottom of the foam board that is 3-inches from the left edge. Repeat on the right edge. Draw a horizontal line from the left to the right and 3 inches down from the top edge of the foam board. Repeat with the bottom edge, but measure 3 inches up. You now have a rectangle shape in the middle of the foam board that is the same size as the material picture. Go ahead and place the material on it to make sure.
8) Cut out the inner rectangle on the foam board using the utility knife. It will take a couple of swipes with the knife, but make sure to cut all the way through the board. If you try to break the board, some of the foam might tear off. Learned that the hard way.
9) Center the material on the poster board. Remember, center is 3 inches from each edge. Glue the picture to the poster board, but only put glue on the extra inch of material.
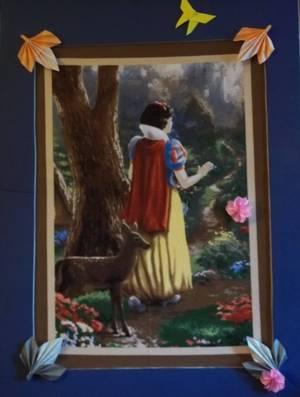
10) Place the foam board over the picture and poster board, lining it up evenly. Looks pretty, doesn’t it? Glue the foam board to the poster board.
11) Add 3D embellishments by gluing fake flowers, origami, or anything else you can find that fits the theme of the picture.