Scrapbook Flair is a free digital scrapbook software that allows you to create your own digital photo scrapbooks. Scrapbook Flair comes preloaded with one border, 74 backgrounds, 37 design ideas, and 15 standard templates. It also comes with seven paper sizes from which to choose. You are also able to download more embellishments, backgrounds, and design templates from their website which is free to join as well.
Downloading Scrapbook Flair
Go to Scrapbookflair.com to download the free scrapbooking software. The scrapbook download is free and takes just a few minutes to do. There are instructions on the website to help you through the downloading process. You can order the cd to download this scrapbooking software. However, there are shipping and handling charges for USA and International residents.
Scrapbook Flair Software Instructions
Once you have the software downloaded on your computer, click on the Scrapbook Flair icon to start the program. The following sections will take you through the steps of using each section.
Choosing a Scrapbook Page Template
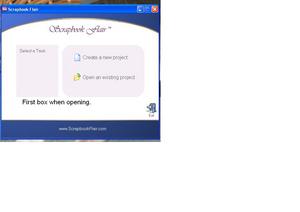
A dialogue box asks you either to “create a new project” or “open an existing project.” You will want to choose “create a new project.” Once you are in the next section, choose “show me some ideas.” This will show you all the ideas and templates from the internet download.
You will want to choose the paper size for your scrapbook from the drop down menu on the left side of this box. You will notice there are several choices from which to choose.
Then choose the template from which you want to work. You will click on the picture of the template to use it. Then click the ok button. This will allow you to use the next screen to create your scrapbook page.
Choosing the Background Options
Now you will want to decide if you will want to add a colored background to your scrapbook page. There are two options for this step. On the menu on the left side of the screen, you will choose “add background.”
NOTE: By using the background options, you will be changing the background you currently have from the template you chose previously.
Option One: Using the templates to make the changes.
This option will open with the “arts” backgrounds. Use the drop down menu to choose from the different background options.
Option Two: Using the single color background choice.
To use this option, you will need to click on the circle next to the “use single color background” on the add background section. You will see the text “background color” with a white rectangle next to it. You will need to click on the rectangle to bring up the color box so you can adjust the colors for this option.
Adding an Image to the Scrapbook Page
Once you have your template and backgrounds chosen, click the add an image icon on the menu. You will then need to click on the text on the scrapbook page to add your photo from your computer or scanner.
Option One: Getting pictures from your computer.
You will need to click on my documents, and find where you have your pictures saved. Then, choose the photo you want to use by clicking on it and click ok. Your photo will be added automatically to the scrapbook page. Now you can resize the photo to fill the photo area where you have placed it. Resize the photo by placing your cursor on the dots on the broken outline of the photo and drag. Make sure you do this from all four sides to keep the photo from becoming blurred.
Option Two: Getting photos from your scanner.
To get a photo from your scanner, you will need to click on the add an image icon. Once you have the area to add the photo, click on the “import from scanner.” You will need to choose the scanning device from the list. Then click “start scan image” and wait until the photo has been scanned. Once the image is scanned, click accept and wait for the scanning process to finish. When the larger view of the picture comes up in the screen, click save and the image is automatically inserted in the scrapbook page. Resize the picture as mentioned above in option one.
NOTE: You will need to name the image and leave the save as type as the jpg file.
Adding Embellishments to the Scrapbook Page
You will need to click on the add embellishment on the menu area. This will enable you to add your embellishments from the embellishment section of Scrapbook Flair. You can also choose your embellishments from your pictures. You can adjust the sizes and placement of your embellishments have been added to the scrapbook page.
Adding Text to the Scrapbook Page
To add text to your scrapbook page, click on the add text icon on the menu bar. The add text box will appear over the middle of your picture. You will need to drag the text box around until you can get it where you want it. In order to add the text, click on the add text link in the box.
You will have another box appear on your screen. This box will allow you to choose the text font, size, bolding, italics, underling, and font color. You can choose whether the text be on the left, centered or on the right sides of the text box.
Adding a Balloon on the Scrapbook Page
The add balloon feature allows you to add text to your photos in a conversation style. These balloons have been used in comic books to show the conversation between characters. Click on add balloon to add this feature to your scrapbook page. You will find that there is an edit option, among other options, with this feature.
Saving Your Scrapbook Page
In order to save your scrapbook page, click on the save icon on the top menu bar. You will want to save the scrapbook page with the “save as” option. This enables you to name the page you have just created. The page you just saved will be on the projects lists on Scrapbook Flair.
Printing Your Scrapbook Page
To print your scrapbook page, click the print icon on the top menu bar. Before printing your scrapbook page, make sure that you have the correct paper size and plenty of color ink for your printer. The page size is listed on the page template menu bar incase you have forgotten by this time.
The Other Scrapbook Flair Menu Icons
Page Icon Feature
The page icon allows you to copy, start a new scrapbook page, and delete a page.
Zoom Icon Feature
The zoom icon allows you to view the page in various sizes.
View Page Layout Feature
The view page icon allows you to view your scrapbook pages in the order you created them under the pagination section. You can also view each page individually under the single page view.
Print Preview Page Feature
The print preview icon allows you to see how the scrapbook page looks before printing.
Share Icon Feature
The share icon allows you to share your scrapbook pages with others. You can upload the pages to the Scrapbook Flair website also.
Export Icon Feature
The export feature allows you to save the scrapbook pages as jpg images, wallpaper on your computer, and as a website file.
You now have learned how to create your first scrapbook page with Scrapbook Flair. Scrapbook Flair allows you to create scrapbooks in paper style or on the internet.
Slideshow showing the different areas of Scrapbook Flair. Scrapbook Flair Slideshow.


