How many times have you already been out somewhere and someone suggests going to a nearby event or place and you have hesitated to go simply because you didn’t know how to get there? Do you own an iPhone 3G? Are you considering purchasing one? Out of all the iPhone 3G’s new features, the accessible GPS integrated with Google Maps may be the most useful and may even change the way you live. Many people who own an iPhone 3G have yet to fully realize just how useful this technology is. I find myself exploring many new places, and doing many more activities than I had before–all without having to ask anyone for directions–since I started using this feature on my iPhone 3G.
The best thing about using the GPS features of your iPhone 3G is that you will not have to shell out the extra money for a dedicated GPS device or any additional monthly subscription fees. The only drawback to this is that you will not get turn by turn voice directions or 3D navigation. There have been rumors that TeleNav and Tomtom will be introducing an iPhone app that provides these features for a monthly subscription fee, but, for now, they are unavailable for iPhone. If you know how to read a map and know the difference between east and west, these features are superfluous anyway. There are some features that utilize Google Maps that have me convinced using the iPhone GPS is superior to a dedicated GPS device or Application anyway.
This article will introduce three ways to maximize GPS and Google Maps on the iPhone 3G:
- Getting and using directions on the fly
- Calling to make reservation, confirm hours, etc.
- Bookmarking My Location and other locations
- Getting and using directions on the fly
One of the things it took me a while to realize about the GPS feature on the iPhone is that it is a dynamic device-after it hones in on your location it will update your position in real time if you keep Google Maps open. After I realized this, it became clear to me that I could use the iPhone 3G while driving to find where I was going.
The first step of using the GPS on the fly is to have the device determine your location. Tap Maps, and then tap the crosshair icon in the lower left hand corner of the screen. Sometimes you’ll have to wait for a while as the iPhone determines your location-you’ll see the crosshairs with a varying radius, the size of which determines the accuracy of your location. Once the crosshairs converge into a blue sphere, your location is accurate to about plus or minus 20 feet (more accurate on roads). If the crosshairs don’t converge to the sphere right way, just wait patiently until they do.
There’s two methods in the next step of obtaining directions on the fly. Use the first one if you know an address and the second if you don’t know an address or even exactly where you’re going at first (it’s for this feature I believe the iPhone to be superior to a dedicated GPS).
For the first method of step 2, tap “Directions” in the lower portion of the screen and type in the address in the “End” field. If you have the location bookmarked, tap the bookmark icon on the right hand portion of the field and tap the bookmarked location. Tap “Route.”
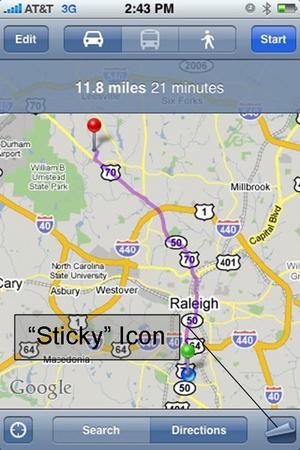
For the second method of step 2, tap “Search” at the bottom of the screen and perform a keyword search such as movies, restaurants, parks, or any other type of place that you might be interested in. A number of pins that match your search field will drop onto the map around your location. Tap on one of them to bring up their name or, better yet tap on the sticky icon on the lower right hand portion of the screen and then tap on “List” to see the names and addresses of all the places that match your search field. Whether your in List or Map view, tap on the right pointing arrow icon (pin has to be selected already) for each place to bring up the details of that location and then tap “Directions to Here” at the bottom of the screen to move to the next screen and then tap “Route.”
Next, follow the purple road. Simply zoom close enough to the map that you can read the street or route numbers and take the turns as the blue sphere approaches each intersection or exit. Tap the sticky icon on the lower right hand corner of the screen and tap “List” to bring up traditional Google Map turn by turn directions. Tap on any number to have Google Maps hone in on that step of the trip.
After the route has been displayed in Map view, there are car, public transit, and pedestrian icons at the top of the screen. Tap one of these to have a car route, public transit, or pedestrian specific routes displayed. Note that the public transit option will only work in cities that support this feature. Go to http://www.google.com/transit for a list of cities that support this feature in Google Maps.
Even if I knew where I was going already, I found it useful and fun to get directions on the fly on a long trip just to see the estimated travel time and distance until my final destination.
Calling to make reservation, confirm hours, etc.
After you click on the right pointing arrow in Step 2 above, tap the phone number on the listing to call the place in question for hours of operation, reservations or any other information you might need. iPhone will prompt you to allow it to make a phone call if you never provided such authorization before. Alternatively, tap the web link to navigate to the establishment’s home page (if they have one) to find out more information that way. Tap “Share Location” if you’d like to email the address directly to a friend. These integrated features of Google Maps are another reason why I think the iPhone is superior to a standalone GPS device.
Bookmarking My Location and other locations
Are you at a place where you don’t know the address or the name of the establishment and might want to return later? Have iPhone determine your location as described earlier. Tap on the sticky icon on the lower right hand corner of the screen and tap “Drop Pin.” Wait a moment until an address displays under the pin. Tap the right facing arrow after the pin is selected. You can now add the location to your bookmarks or contacts (if the location is associated with someone else’s house or work) so you can return later. The same procedure can be used if you know an address of a particular location or something interesting shows up in a search you might want to pull up with ease later. You can also add addresses to contacts in Contacts and pull them up from Google Maps by tapping the Bookmark icon in search and then tapping Contacts at the bottom of the screen.
I found it particularly useful to bookmark many locations before showing someone a night out on the town, unsure of exactly where they might want to go beforehand, and then I was able to pull up directions to where they decided they wanted to go with ease while we were out on the town.
There are other features of iPhone 3G and Google Maps that are useful that have not been covered here (traffic, satellite view, pulling up recent searches, etc.) but once you become familiar with the three procedures depicted above, you’ll have no trouble figuring them out on your own. Now you’ll have no trouble finding things to do, exploring new places, or finding new restaurants on the fly.
Source Material
Jake Gaecke, “TeleNav bringing GPS navigation to iPhone 3G.” appletell.


