Drip. Drip. Drip. There’s nothing quite so aggravating as a leaky faucet, as you watch beads of water form either quickly or slowly and drop to the ground. A leaking outdoor faucet is more than an annoyance, however; in addition to the moisture that can build up next to your house, you’re also losing money with every drip of wasted water. Fortunately, a leaking outdoor faucet is easy to repair, and you only need a few simple tools and a little patience. The tools you need to gather before you start are an adjustable wrench or vise grips, a Phillips head screwdriver, and a rubber washer.
First, turn off the water to your house. This will save you an unexpected (although possibly refreshing) shower. There are two ways to turn off the water; one is to turn off the main water shutoff inside your house (typically located near the hot water heater); the other is to shut off water to your house at the street. The latter method requires one additional tool: a curb key, also called a water main key, which is generally sold at most home improvement stores. To use this method, take the curb key to your water meter, open the meter cover, and insert the key at the notch inside the water meter which controls the flow of water from the street to your house. Use the key to turn the notch clockwise about 1/2 turn, or until it won’t turn anymore.
Now that you’ve turned off the water to your house, you’ll want to make sure all the water is out of the line which runs to the outdoor faucet. Turn the valve of the faucet to the on position, and wait until water has stopped flowing from the faucet. If water continues to come out of the faucet after about 15 seconds, check to make sure that you have turned the water shutoff completely off.
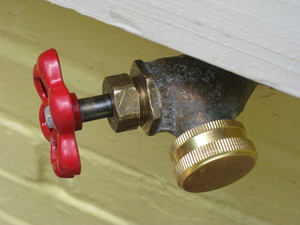
After you’ve drained all of the water from the faucet, you’re ready to get to the likely source of the leak: a broken or disintegrating washer. To reach the washer, it is necessary to take the faucet apart. First, use a Phillips head screwdriver to remove the valve (the part you turn in order to turn the water flow on or off) by turning the screw holding the valve in place counterclockwise until it comes out of the valve. Pull gently to remove the valve, and set both the valve and screw aside. Next, remove the packing nut (the thick nut about 1/2″ in diameter) by using your adjustable wrench or vise grips to unscrew the nut from the threaded part of the faucet; set this nut aside, too. Finally, again using your wrench and vise grips, unscrew the larger hexagonal-shaped nut and set it aside as well. You should now be able to remove the faucet; you may need to gently but firmly twist the faucet while pulling to remove it from the house. At the end of the faucet is the washer that’s most likely causing your leak. Gently remove it (this may require the use of a flat head screwdriver to nudge it out of place), and replace it with a new washer.
You’ve now fixed the leak, and the only thing left to do is to reassemble the faucet. Insert the faucet back into the house, and screw the hexagonal nut back in place; use your wrench or vise grips to tighten the nut. Next, screw on the packing nut, and again tighten it with the wrench or vise grips. Finally, put the valve back onto the end of the faucet, and use the screwdriver to tighten the screw that holds the valve in place. Turn the valve clockwise completely to the “off” position, and then turn the water to the house back on. Check for any leaks. If water is leaking from somewhere other than the original leak from the spigot, be sure to tighten all the nuts until the leak stops.
Plumbing projects may seem intimidating, but fixing a leaky outdoor faucet is pretty simple, and worth the effort to save money on water bills along with aggravation of watching water drip all day long.
Source: personal experience