Whether you want a collection of pumpkins featuring your family’s faces out on your front lawn for Halloween, to commemorate a deceased loved one in this season of honoring ancestors, or a unique centerpiece to display for your Halloween wedding, jack-o-lantern portraits can be an outstanding addition to your fall decor. Best of all, you don’t need to be a great artist to create these beauties- just the right tools, patience, and a steady hand. With a little practice, you can elevate your jack-o-lantern carving skills to mastery and astound your friends and neighbors with your creations.
Whenever doing a complicated carving, consider using a synthetic carvable pumpkin rather than a real one. Real pumpkins, as they begin to rot, will quickly distort the features of the faces carved onto it. If you carve it too early, if the pumpkin was already beginning to rot (as many super-market pumpkins are in October), if the weather is warm or you are using a candle, you risk your pumpkin not even lasting to get you through the festive night. Synthetic pumpkins will last without distorting, and can stored away and be displayed again year after year.
Tools you will need:
– A pumpkin (real or synthetic)
– A pumpkin carving saw or small serrated knife
– A metal spoon or plastic pumpkin scraping scoop
– A computer with photo editing software and printer
– scissors
– “low stickability” tape, such as blue painters tape
– A thumbtack
– flour (optional)
– A craft knife or exacto-knife
Once you have your carving pumpkin- synthetic or real- you’ll want to prepare it for optimum display. On the bottom of the pumpkin, cut a circle just large enough to allow your fist inside. It must also be large enough to allow for your light, preferably an electric light. The heat of candles can accelerate the rotting and molding of real pumpkins (never use a candle in a synthetic pumpkin), and the light from most battery powered pumpkin lights are not bright enough to do your jack-o-lantern justice.
After carving out the bottom circle, place your pumpkin on a table and make sure it stands sturdily. If it is wobbly or lop-sided, you may wish to carefully carve a little more from the bottom to ensure it stands straight and steady.
Scoop out guts or stuffing, and with a metal spoon or plastic pumpkin scraper, scrape the insides of the pumpkin until the walls are 1/4 to ½ inches thick. You’ll want it thin for maximum luminance. Rather than carving the portrait through the flesh of the pumpkin and removing portions, the technique you’ll be using for carving portraits is to scrape off the top layer of orange skin, leaving the yellow flesh intact. The thinner the flesh, the more the light will shine through.
Take a photograph of the person whose portrait you wish to carve. For best results, it should be a head shot rather than a full-body shot. Make sure the flash in the photo did not wash out the person’s distinguishing features- the more shadows and highlights that appear on the person’s face, the better.
Scan the photo on a computer and, using photo editing software, convert it to a black and white “sketch” or “photo copy.” This will create a lifelike image of the face while eliminating all but the most distinguishing lines and features. Resize the image so that it will print out the size you want the portrait to be on the pumpkin and print it out in black-and-white. You now have a template to work with.
Cut excess paper off the template in a circle or oval around the face, leaving a good 1 inch between the lines of the face and the edge of the paper. Then, cut several lines around, from the edge of the paper, in toward the face, stopping just short of hitting the face. Since the pumpkin is round and bumpy, this will help to adhere the template to the pumpkin.
Decide on the pumpkin where you would like to put the portrait. Ideally it should be on the smoothest, flattest, most evenly-colored side. If your pumpkin has very deep ridges in it, play with the template on top of the pumpkin by moving it around, pressing the paper into the lines. Note where the lines would be in the carving of the face- does it make the face look distorted? If so, move the template around until the ridges fall where they are less distracting. You can try to use the ridges to enhance your portrait, but putting them in strategic places to help the portrait look 3-D, such as down the side of the face, or along the line of the nose.
Once you have your placement, use your low stickability tape to adhere the template to the pumpkin. Low stickability is particularly important if you are using a synthetic pumpkin- you don’t want the tape to peel the painted top coat of orange off the pumpkin. Ensure that the template lies flat, and that you have creased the template into any ridges of the pumpkin.
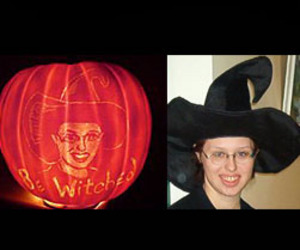
At this point you will need to decide if you want if you want to do a negative or a positive image. A negative image would be to carve away the lines in your template, which would leave you with a predominately orange face outlined in yellow, such as the hat in the photo provided. This is a bit easier to manage, especially if you are not completely confident with your carving skills. A positive image will leave the dark orange as the lines, with an overall yellow face, such as the face in the sample photo. It’s a bit more tricky, but makes a much brighter jack-o-lantern. Of course, you can do a combination as I have in the photo, however you will need to decide which method you will use for each part before transferring the template.
If you choose to do a negative image, take your thumbtack (the kind with a little knob is much easier to handle than the flat top) and begin poking small holes, approximately 1/16th of an inch from each other (or closer), along the black lines of your template.
If you choose to do a positive image, begin poking holes around the black lines in your picture, as if outlining them. In tight spaces, try to ensure that your holes do not go over the black lines. When you remove your template and begin to carve, you’ll be carving around where the black lines would be, in order to leave the orange paint on the pumpkin intact.
After you’ve completely transferred your template, remove it carefully so not to peel the orange off the pumpkin. Put it somewhere you can see it so that you can refer to it when carving.
Now it’s just a matter of carving by connecting the dots. If you wish to make your dots more visible, rub some flour onto the surface of your pumpkins and all the little dots will fill with flour and become white, making them easier to see.
If you’re doing a negative image, begin carving the lines of the face with your craft knife by following the dots. If you’re doing a positive image, you’re carving away everything but what would be the lines of the face as featured in your template.
Take your time, working little by little so that you don’t remove too much at one time. Remember, you’re not cutting completely through like with those triangular-eyed, snaggle-toothed pumpkins you remember as a child. You’re scraping away layers for a textured effect, leaving the yellow flesh intact. Keep the blade on an angle and slice in across your guidelines.
When you’re done, you’ll be ready to display your jack-o-lantern portrait.