So, you want to create a blog on your website and you want it to look like you actually created it as well as have some authority over who publishes on it. Well, installing WordPress might be the best solution for you.
1. The first thing you’ll need to do is to go to www.wordpress.org and download WordPress 2.7.
2. Go to the folder that contains your website and create a folder named blog.
3. Open the folder wordpress 2.7 and unzip (or extract) the files into your website folder, specifically into the folder you just created named blog.
4. Once complete, open the Notepad application and the file wp-config-sample.php, which will be in the folder blog.
5. Go to the Save As command on the File menu, and save the file as wp-config.php (you won’t need to change any of the default settings, just make sure the file name reads exactly wp-config.php).
6. Now go to your administration on the 1 and 1 website.
7. Next under the section Webspace and Allocation select the option for MySQL Administration.
8. On the upper-lefthand corner of the table listing the current databases (grey) there is a button that says, “New Database.” Select this option to create a new database.
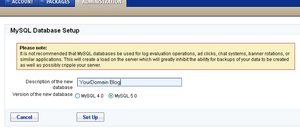
9. Next you’ll be asked to type a description of the database. Please type in a simple description of your databse, like Jenny’s Hair Blog.
10. Then select the option for MySQL 5.0 and click Set Up.
11. 1 and 1 then returns all the necessary information to finish the installation process. (Keep this page open for reference.)
12. Go back to the NotePad file you worked with a few minutes ago (wp-config.php).
13. On the line that states, “define(‘DB_NAME’, ‘putyourdbnamehere’);” Insert the name of your database where it says putyourdbnamehere (you’ll want to add it within the inside quotes). Example db name: ‘db269204777’
14. Then on the line that states, “define(‘DB_USER’, ‘usernamehere’);” Insert your username where it says usernamehere (you’ll want to add it within the inside quotes). Example username: ‘dbo269204777’
15. Then on the line that states, “define(‘DB_PASSWORD’, ‘yourpasswordhere’);” Insert your password where it says yourpasswordhere (you’ll want to add it within the inside quotes). Example password: ‘X+)rRSiC’
16. Then on the line that states, “define(‘DB_HOST’, ‘localhost’);” Insert your localhost (yes, you are the 1% that needs to change this line!) where it says localhost (you’ll want to add it within the inside quotes). Example localhost: ‘db1999.perfora.net’
17. Save the file wp-config.php. Close the file.
18. Now open Dreamweaver. Make sure the appropriate website is open in the file manager. Select the folder blog and put the folder on your server.
19. This put will take some time, so please be patient there are a lot of files to be transferred.
20. Finally, open up your web browser and navigate to http://www.yourdomain.com/blog/wp-admin/install.php
21. You will be asked to name your blog and for your email address. Follow these instructions to complete the installation process.
22. Congratulations! You’ve done it. Good luck with your blog. 🙂